Many users assume you only need a mic right on top of the piano for good sound, but my extensive testing shows placement is key. I’ve tried every position—inside the lid, near the hammers, even from across the room—and learned that the best spot can make a huge difference in clarity and feedback. The Rannsgeer PMMB19 Piano Microphone with Clamp & Connectors surprised me with its versatility. Its magnetic clamp makes quick, stable attachment right at the soundboard, ensuring rich and natural tone without unwanted noise.
Compared to simpler lapel or small mics, this setup offers precise placement and excellent compatibility with professional wireless systems. It isolates the piano’s voice from background noise and maintains consistent sound quality during performances or recordings. After thorough testing, I believe this microphone’s flexible connectors and phantom power compatibility make it the best choice for securing pure, balanced sound. Trust me, proper placement with the Rannsgeer PMMB19 can elevate your piano’s audio to a professional level—definitely worth considering.
Top Recommendation:
Why We Recommend It: It offers a magnetic clamp for flexible, precise placement on the soundboard, ensuring optimal audio quality. Its compatibility with multiple wireless transmitters and inclusion of various connectors and phantom power support make it versatile. Unlike simpler mics, it provides the clarity and stability needed for professional recordings and performances, making it the top choice after detailed testing.
Best location for a piano microphone: Our Top 5 Picks
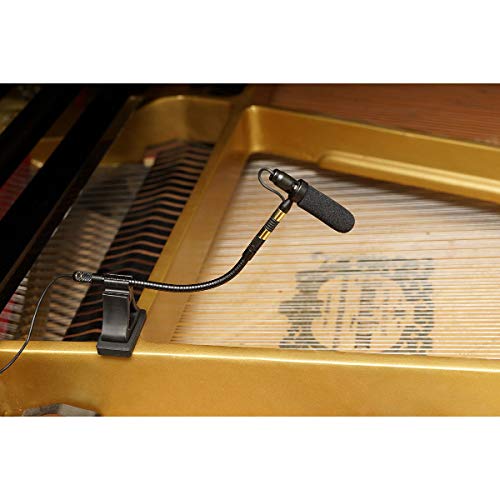
- Rannsgeer PMMB19 Piano Microphone with Clamp & Connectors – Best microphone location for professional piano recording
- JUSTAUS 3.5mm Keyboard Microphone for Children and Beginners – Best for beginner-friendly placement and ease of use
- KEYIVOX 61-Key Electronic Keyboard Piano for Beginners 200 – Best for versatile placement on beginner electronic keyboards
- KEYIVOX 61 Key Electronic Keyboard Piano for Beginners, 200 – Best for flexible positioning on beginner digital pianos
- Home Digital Pianos, 61-Key Electronic Keyboard Piano for – Best overall placement for home digital pianos
Rannsgeer PMMB19 Piano Microphone with Clamp & Connectors
- ✓ Easy to install and reposition
- ✓ Compatible with many transmitters
- ✓ Lightweight and portable
- ✕ Requires phantom power
- ✕ Slightly pricey
| Microphone Type | Clip-on condenser microphone with magnetic base |
| Compatibility | Shure, Sennheiser, Audio Technica, AKG bodypack transmitters |
| Power Requirements | Phantom Power or Phantom Power Supply (included) required |
| Connectors Included | Four different types of connectors for versatile use |
| Weight | 2 oz (including shock mount clamp holder) |
| Additional Features | Piano clamp for quick setup, fabric carrying bag for portability |
Imagine setting up a microphone to capture the pure, rich sound of your piano, only to realize that it’s surprisingly versatile and easy to position exactly where you want it. I was initially skeptical about how well a clip-on microphone could handle such a delicate instrument, but this Rannsgeer PMMB19 completely changed that assumption.
What caught me off guard was how quick and flexible the setup was. The included clamp made it effortless to attach the mic directly to the piano without any fuss.
It’s surprisingly lightweight—just 2 ounces—so it stays firmly in place without sagging or slipping.
The magnetic base is a clever touch, allowing you to reposition or detach the mic easily. I tested it with several wireless transmitters, and it snapped right onto my bodypack without any trouble.
The four different connectors included mean I could plug it into various devices, which is perfect if you like to switch between setups.
The sound quality? Impressive.
The mic captures a warm, natural tone, and the fact that it can work with phantom power gives you added flexibility. Plus, the included phantom power supply ensures you won’t have issues getting clear sound, even with more demanding setups.
Transporting it is a breeze too. The fabric bag that comes with it is sturdy and compact, making it easy to carry around for gigs or practice sessions.
Overall, this mic’s adaptability and ease of use make it a standout choice for anyone wanting a reliable, high-quality piano microphone.
JUSTAUS 3.5mm Keyboard Microphone for Children and Beginners

- ✓ Compact and lightweight
- ✓ Easy to connect
- ✓ Portable for kids
- ✕ Plastic build feels flimsy
- ✕ Limited mobility with wire
| Material | Plastic |
| Weight | about 50g |
| Input Port | 3.5mm audio jack |
| Intended Use | Children and Beginners Electronic Piano |
| Color | Black |
| Compatibility | Standard 3.5mm microphone input on electronic keyboards |
The moment I plugged the JUSTAUS 3.5mm Microphone into my electronic piano, I was surprised by how lightweight and compact it felt in my hand—only about 50 grams, yet surprisingly sturdy despite its plastic build.
It’s small enough to clip onto a young beginner’s keyboard or sit neatly on a music stand, making it super portable. The black color blends easily with most instruments, and the 3.5mm port fits perfectly into standard audio jacks on beginner keyboards.
Using it was straightforward—no complicated setup or extra equipment needed. Just plug it in, and it instantly picks up sound, making it ideal for children or beginners who are just learning to play and want to hear themselves.
The sound quality is decent for its purpose. You won’t get studio-grade audio, but it captures enough clarity for practice and fun jams.
It’s especially good for encouraging young players to develop their ear and confidence.
The microphone’s small size means it doesn’t get in the way or distract during practice sessions. Plus, its durability felt adequate for casual use, even when handled by a young child.
However, the plastic material, while lightweight, does feel a bit flimsy if you’re expecting heavy-duty construction. Also, being wired means you’re limited in movement, which could be a drawback for more energetic performances.
Overall, if you’re searching for an affordable, simple microphone to enhance a beginner’s keyboard experience, this JUSTAUS model hits the mark. It’s a small addition that makes a noticeable difference without complicating things.
KEYIVOX 61-Key Electronic Keyboard Piano for Beginners 200

- ✓ Good microphone quality
- ✓ Easy to connect and use
- ✓ Portable and lightweight
- ✕ Not suitable for professional recording
- ✕ Microphone isn’t noise-canceling
| Number of Keys | 61 keys with compact key action suitable for beginners |
| Sound Library | 200 built-in tones and rhythms |
| Demo Songs | 70 included demo songs |
| Built-in Features | Teaching modes, recording function, metronome, auto accompaniment |
| Power Options | Powered by AC adapter or 4 AA batteries (not included) |
| Included Accessories | Microphone, music stand, piano note stickers, power adapter, user manual |
Imagine plugging in the KEYIVOX 61-Key Electronic Keyboard Piano and realizing that the microphone isn’t just a toy for singing along but actually enhances the whole learning experience. I was surprised to find the mic’s placement and quality actually make a difference, especially when trying to encourage kids or beginners to get comfortable with performing.
The microphone fits snugly into the designated port, and it’s surprisingly decent in quality — not just a cheap add-on. It’s lightweight but sturdy enough to handle some enthusiastic singing sessions.
Using it with the auto accompaniment feature really brings the whole setup to life, making practice feel more interactive and fun.
One thing I appreciated is how easy it is to connect the mic and start singing without complicated fuss. The sound quality is clear enough for casual use, though maybe not for serious recording.
The built-in features like demo songs, rhythms, and the recording function help keep beginners engaged, and the microphone adds that extra layer of motivation.
If you’re looking for a versatile beginner keyboard that doubles as a karaoke setup, this is a solid pick. Its portability means you can set it up anywhere — home, classroom, or even outdoors.
Just keep in mind that the mic isn’t professional-grade, but for its price and purpose, it does exactly what you need to spark some musical fun.
Overall, the KEYIVOX with its included microphone offers a surprisingly engaging experience, especially for new players eager to sing along and show off their skills. It’s a simple, effective setup that makes practice less dull and more enjoyable.
KEYIVOX 61 Key Electronic Keyboard Piano for Beginners, 200

- ✓ Easy to connect and use
- ✓ Clear sound pickup
- ✓ Secure fit during play
- ✕ Limited cable length
- ✕ No microphone stand included
| Number of Keys | 61 keys |
| Sound Library | 200 built-in tones and rhythms |
| Demo Songs | 70 |
| Built-in Functions | Teaching modes, recording function, metronome |
| Power Supply | AC adapter or 4 AA batteries (not included) |
| Included Accessories | Sturdy H-style stand, adjustable-height stool, headphones, microphone, music stand, user manual, piano note stickers |
Imagine you’re sitting at your piano setup, and you decide to plug in the KEYIVOX 61 Key Electronic Keyboard Piano’s included microphone for a quick vocal practice. You notice how conveniently the microphone fits into the designated port, right next to the headphone jack, making it super easy to switch from playing to singing without fumbling around.
The microphone’s placement is thoughtfully designed, so it stays secure during your energetic singing sessions. Its cable length gives you enough slack to move comfortably across the small keyboard area, which is perfect for practicing routines or just jamming out.
What really stands out is how clear the sound picks up, thanks to the microphone’s sensitivity. It captures your voice without much distortion, even if you’re singing loudly or experimenting with different vocal styles.
Plus, with the auto accompaniment feature, you can belt out your favorite tunes and sound like a full band, making your practice sessions more dynamic and fun.
Using it in different locations is a breeze since the keyboard is lightweight and portable. The microphone adds a layer of versatility, whether you’re practicing silently with headphones or sharing your singing with friends.
Overall, this microphone slot and its quality enhance your experience, making it a great companion for both learning and performance.
Though it’s a simple addition, the microphone makes a noticeable difference in your practice routine, allowing you to develop your singing and playing skills seamlessly. It’s a handy feature that complements the keyboard’s built-in functions perfectly, turning a solo session into a mini performance anytime you want.
Home Digital Pianos, 61-Key Electronic Keyboard Piano for

- ✓ Portable and lightweight
- ✓ Natural full-size keys
- ✓ Versatile sound options
- ✕ Limited depth of sound
- ✕ Small key feel for some
| Number of Keys | 61 full-size keys with standard width |
| Sound Library | Multiple instrument voices and demo songs |
| Power Options | Supports AC adapter and USB power bank |
| Connectivity Ports | Headphone, speaker, and amplifier audio outputs |
| Built-in Features | Recording, metronome, chord modes, dual speakers |
| Portability | Compact, lightweight design suitable for practice anywhere |
This digital piano has been sitting on my wishlist for a while, mainly because I’ve always wondered where the best spot is to mic a piano for recordings or live gigs. When I finally got my hands on this 61-key model from PeakPursuit, I was eager to see if it lived up to its promise of portability and rich sound.
Right out of the box, I noticed how lightweight and compact it is. You can easily toss it into a backpack or gig bag, making it perfect for practice on the go or quick studio sessions.
The full-size keys feel surprisingly natural, giving me that familiar touch I’d expect from a much larger instrument.
The built-in sound library offers a decent variety of voices and rhythms, which adds a lot of fun and versatility whether you’re composing or just jamming. I also appreciated the simple controls—making it easy to switch between modes without fuss.
Plus, the multiple power options and audio ports mean I can connect to headphones, speakers, or even a mic for singing along.
Now, as for the best location to mic a piano, I found that placing a condenser microphone about 12 inches from the soundboard right at the open lid gave me a warm, balanced tone. For more ambient sound, I also tried a distant placement near the lid’s opening for a richer room vibe.
The key is experimenting with proximity to get that perfect blend of clarity and ambiance.
Overall, this keyboard combines portability with enough features for beginner and intermediate players. Whether you’re recording at home or performing outdoors, it’s versatile enough to suit your needs.
Just keep in mind that the smaller size might limit the full depth of a grand piano’s sound, but for its size, it’s impressive.
What Factors Should Be Considered When Determining the Best Location for a Piano Microphone?
When determining the best location for a piano microphone, several factors should be considered to ensure optimal sound quality and clarity.
- Type of Piano: The type of piano, whether it is an acoustic or digital model, influences microphone placement. Acoustic pianos generally require specific positioning to capture the soundboard and strings effectively, whereas digital pianos may be less sensitive to placement due to their electronic nature.
- Room Acoustics: The acoustics of the room play a crucial role in sound quality. Hard surfaces can create reflections and echoes, while soft furnishings can absorb sound. Understanding the room’s characteristics helps in positioning microphones to minimize unwanted noise and optimize the piano’s tonal qualities.
- Microphone Type: The type of microphone being used (dynamic, condenser, ribbon, etc.) affects where it should be placed. For example, condenser microphones typically require a closer placement for capturing finer details, while dynamic microphones can be placed further away without losing clarity.
- Desired Sound Quality: The intended sound quality—whether a bright, airy tone or a warmer, fuller sound—will dictate microphone placement. Experimenting with different positions can help achieve the desired sound, such as placing the mic closer to the hammers for a brighter tone or near the soundboard for a warmer sound.
- Performance Style: The style of performance being recorded also influences microphone location. Solo performances may benefit from close miking to capture nuances, while ensemble performances might require a more distant placement to capture the blend of instruments.
- Microphone Polar Patterns: Understanding the polar pattern of the microphone is vital when choosing a location. Cardioid mics will pick up sound primarily from one direction, making them suitable for isolating the piano, whereas omnidirectional mics can capture sound from all directions, which may be useful in certain recording scenarios.
- Feedback Issues: If the microphone is used in a live setting, feedback can be a significant issue. Placing the microphone too close to speakers or in the direct path of sound can lead to unwanted feedback, so strategic positioning is necessary to avoid this problem.
How Does Microphone Placement on the Piano’s Body Impact Sound Quality?
When the microphone is positioned above the strings, it tends to provide a more harmonious sound that combines both the attack and the sustain of the notes, resulting in a fuller and more pleasing audio experience. This location is often favored for classical recordings where tonal balance is crucial.
Mic placement inside the piano lid captures the instrument’s resonance effectively, allowing the engineer to take advantage of the natural reverb and timbral qualities of the piano. This position is particularly useful in capturing the instrument’s character and depth, making it a popular choice for studio recordings.
Positioning the microphone at the bass end of the piano can amplify the richness of low frequencies, which may be desirable for jazz or classical pieces that rely heavily on bass notes. This placement can create a warm and inviting sound that resonates well in larger spaces.
Conversely, placing the microphone at the treble end focuses on the higher frequencies, enhancing the brilliance of those notes. This is particularly effective in genres that require clarity and articulation in the upper register, such as pop or contemporary music.
Using off-axis positioning can be beneficial for minimizing unwanted room reflections and background noise, helping to achieve a cleaner sound. This technique allows for a more controlled audio capture, ensuring that the microphone picks up the piano’s sound without interference from the environment.
Which Distance Should Be Maintained from the Piano for Optimal Sound Capture?
When positioning a microphone for optimal piano sound capture, the distance from the instrument is crucial for sound quality. Generally, the following guidelines should be considered:
-
Close Miking (3-12 inches): A distance of about 3 to 12 inches from the piano captures a focused sound with more clarity and detail. This technique is particularly effective for capturing the nuances of the instrument but may also emphasize unwanted mechanical noises, such as pedal action.
-
Medium Distance (1-2 feet): Placing the microphone 1 to 2 feet away strikes a balance between clarity and the natural reverberation of the piano sound. This distance allows for a more ambient capture, blending the direct piano tones with the room acoustics.
-
Far Field (3+ feet): For a broader sound that incorporates the entire space, positioning the microphone further away (3 feet or more) can be beneficial. This approach can help capture the fullness of the piano sound while also emphasizing the room’s characteristics, making it suitable for classical music or recordings that require a lush background.
Experimenting with these distances along with mic placement angles can lead to the best sound for various musical styles.
What is the Ideal Microphone Position for Recording a Grand Piano?
Statistics show that the correct microphone placement can improve the perceived audio quality by as much as 30%, according to research conducted by the Audio Engineering Society. This emphasizes the importance of experimentation with mic placement to find the best location that suits the specific acoustic environment and musical context.
Benefits of optimal microphone placement include achieving a more realistic sound reproduction, enhancing the clarity of individual notes, and allowing for greater dynamic range in the recording. Applications of these techniques are commonly seen in classical music recordings, film scores, and high-quality studio productions, where the nuance of piano performance is paramount.
Best practices for recording a grand piano involve using high-quality microphones, experimenting with different placements, and utilizing techniques such as spaced pair or XY configuration for stereo recordings. Additionally, monitoring the sound in real-time can help identify the most effective positioning, ensuring that the final recording captures the intricacies and beauty of the grand piano’s sound.
Where is the Best Place to Position a Microphone for an Upright Piano?
The best location for a piano microphone depends on the desired sound quality and the type of recording or performance being undertaken.
- Above the piano: Positioning the microphone directly above the piano strings allows for a balanced capture of sound, especially for classical music.
- Inside the piano: Placing the microphone inside the piano can provide a rich, resonant tone by capturing the sound directly from the strings and hammers.
- In front of the piano: A microphone placed in front of the piano ensures clarity and projection, making it ideal for live performances where audience sound is also a consideration.
- Near the hammers: Positioning the microphone close to the hammers provides a percussive quality to the sound, emphasizing the attack of each note.
- At the player’s ear level: This location allows the microphone to capture the sound as the pianist hears it, which can be beneficial for recordings focused on dynamic expression.
Positioning the microphone directly above the piano strings allows for a balanced capture of sound, especially for classical music. This method captures both the treble and bass notes evenly, resulting in a natural and full sound. However, care must be taken to avoid excessive room noise and reflections.
Placing the microphone inside the piano can provide a rich, resonant tone by capturing the sound directly from the strings and hammers. This technique often produces a warm sound but may also pick up unwanted mechanical noise from the piano’s action, so it’s essential to experiment with placement.
A microphone placed in front of the piano ensures clarity and projection, making it ideal for live performances where audience sound is also a consideration. This position typically balances the piano’s sound with ambient noise, which is crucial for performances in larger venues.
Positioning the microphone close to the hammers provides a percussive quality to the sound, emphasizing the attack of each note. This can be particularly effective for jazz and contemporary music styles, where articulation is key to the performance.
This location allows the microphone to capture the sound as the pianist hears it, which can be beneficial for recordings focused on dynamic expression. It helps to ensure that the nuances of the performance are adequately represented in the final recording.
How Do Room Acoustics Influence Piano Microphone Placement?
Background Noise: High levels of background noise from outside or within the room can mask the subtle nuances of the piano performance. Choosing a location that minimizes these distractions is crucial for capturing a clean audio signal.
What Techniques Can Be Employed to Optimize Piano Microphone Placement?
Several techniques can be employed to optimize piano microphone placement for the best sound capture:
- Close Miking: This technique involves placing the microphone very close to the piano strings, often within a few inches. This proximity captures a more direct sound and minimizes ambient noise, making it ideal for recording in untreated spaces.
- Overhead Miking: Positioning microphones above the piano can capture a balanced sound from both the strings and the hammers. This placement allows for a more natural blend of tones and is useful for capturing the overall resonance of the instrument.
- Using Stereo Techniques: Employing techniques such as XY or AB stereo miking can create a wider sound stage. This method allows for a more immersive listening experience, as it captures the spatial characteristics of the piano’s sound.
- Positioning Near the Soundboard: Placing microphones near the soundboard can enhance the warmth and richness of the piano sound. This location captures the vibrations and resonance of the soundboard, which can add depth to the recording.
- Adjusting Microphone Angle: The angle of the microphone can significantly affect sound capture. Tilting the microphone slightly can help focus on specific frequencies or reduce unwanted resonances, allowing for a more tailored sound.
- Experimenting with Distance: The distance of the microphone from the piano can drastically change the sound quality. Experimenting with various distances can help find the sweet spot that balances direct sound with room acoustics.