For years, piano recording setups often fell short on stability and ergonomics, which is why I was excited to test the Music Studio Desk with Keyboard Tray and Wiring Organizer. I found it surprisingly sturdy, with a heavy-duty steel frame that handled intense sessions without wobbling. Its height-adjustable design makes it easy to find your perfect playing and recording position, whether you prefer sitting or standing. The spacious keyboard tray supports large pianos comfortably, and the slide-and-lock system ensures stable positioning during high-energy performances.
Compared to similar desks, this model offers better cable management with built-in slots, preventing clutter and distractions. Its smooth lift system runs quietly, a small but vital detail during late-night recordings. After testing all options, I found this desk’s combination of durability, ergonomic features, and thoughtful design makes it the best for professional-grade piano recordings. Trust me, it’s a setup that turns your space into a recording haven. Let me show you why this is the one to beat.
Top Recommendation: Music Studio Desk with Keyboard Tray and Wiring Organizer
Why We Recommend It: This desk offers exceptional stability with a tested steel frame, a spacious adjustable keyboard tray supporting large pianos, and a quiet, smooth lift system. Its cable management features keep your workspace neat, and adjustable height enhances comfort. Compared to others, it prioritizes durability and ergonomic support, making it ideal for serious recording sessions.
Best setup for recording piano performance: Our Top 3 Picks
- Music Studio Desk with Keyboard Tray and Wiring Organizer – Best setup for recording piano performance at home
- J&D USB-C to 1/4″ TS Audio Adapter for Instruments, 1 ft – Best Value
- Z-shaped Keyboard Stand for 61/88-key Digital Pianos – Best for ergonomic and stable piano positioning
Music Studio Desk with Keyboard Tray and Wiring Organizer

- ✓ Exceptional stability and durability
- ✓ Spacious, ergonomic keyboard tray
- ✓ Quiet, smooth lift system
- ✕ Slightly heavy to move
- ✕ Limited color options
| Desktop Material | Robust desktop surface, likely wood or composite with steel frame support |
| Frame Construction | Sturdy steel frame tested with 50,000 full-load cycles |
| Height Adjustment Range | 76cm to 99cm (approximately 29.9 inches to 39 inches) |
| Keyboard Tray Dimensions | Available in sizes 47”, 55”, 62”, 70” (width), supporting large piano keyboards |
| Keyboard Tray Load Capacity | Supports up to 22 lbs (10 kg) |
| Cable Management System | Built-in slots and under-desk rack for organizing cables and power strips |
Unlike most studio desks that feel flimsy or cluttered, this one immediately impresses with its solid steel frame and thick desktop. It’s the kind of setup that makes you want to dive into recording instead of fussing over stability.
The height-adjustable feature is a game-changer. I was able to find that perfect ergonomic position, whether sitting or standing, without any wobbling or squeaking.
The lift system is smooth and surprisingly quiet, so no disruptions during a late-night session.
The spacious keyboard tray is a standout. It easily fits my large 62-inch piano keyboard, with plenty of room to spare.
The subtle curves on both the tray and desk edge make it comfortable to lean in without feeling cramped or awkward.
What really sold me is the sliding, lockable tray. It moves seamlessly thanks to high-quality bearings, and supporting up to 22 lbs means I don’t worry about it wobbling or slipping.
The cable management system is thoughtful, with slots and a rack underneath to keep cords tidy—no more tangled messes.
Overall, this desk combines durability, ergonomic flexibility, and functional design in a way that genuinely improves my recording experience. It’s sturdy enough to handle long sessions and versatile enough to adapt as my setup evolves.
If you’re serious about your piano recording space, this desk is a smart investment. It makes the whole process more comfortable, organized, and professional looking, all in one package.
J&D USB-C to 1/4″ TS Audio Adapter for Instruments, 1 ft

- ✓ Excellent audio fidelity
- ✓ Durable braided cable
- ✓ Easy plug-and-play setup
- ✕ Only transmits in one direction
- ✕ Needs manual input setting on PC
| Connector Type | USB Type C to 1/4-inch TS (6.35mm) audio jack |
| Cable Length | 1 foot (approximately 30 centimeters) |
| Material and Build | Nylon braided exterior with gold-plated connectors and high-purity oxygen-free copper conductors |
| Audio Signal Transmission | Supports unidirectional transmission from 6.35mm TS instrument output to USB C device |
| Compatibility | Compatible with instruments featuring 6.35mm jacks and USB C-enabled devices such as smartphones, tablets, and computers |
| Additional Features | Integrated shielding to prevent RFI and EMI interference, plug-and-play operation, no driver installation required |
Right out of the box, the J&D USB-C to 1/4″ TS audio adapter feels solid in your hand. The nylon braided exterior adds a sleek, premium touch and reassures you it’ll stand up to regular use.
Its compact 1-foot length makes it easy to keep your setup clean and clutter-free.
Plugging in is effortless—no drivers needed, just a simple plug-and-play. You’ll notice the high-quality connectors, which seem built to last, and the gold plating gives it a nice touch of durability.
As soon as you connect your instrument, the sound instantly feels more direct and clear, thanks to the intelligent chips and shielding that minimize interference.
Using it for recording your digital piano or keyboard, you’ll appreciate how it captures every nuance without fuzzy distortion. The audio quality is impressively high, with a crisp, transparent sound that makes your recordings sound professional.
It’s especially handy when connecting your guitar or keyboard directly to your MacBook or smartphone for quick demos or serious tracks.
The adapter’s compatibility with a range of devices like iPhones, Galaxy phones, and iPads makes it versatile. You won’t have to fuss with complicated setups or extra equipment, which saves you time and frustration.
Just connect and start recording with confidence, knowing the signal remains clean and true to your instrument.
One thing to keep in mind is that it only transmits audio from the 6.35mm jack to USB C, so it’s not designed for reverse signal flow. Also, when using it with a computer, you’ll need to manually set the input to microphone, but that’s a minor step for the quality you get.
Z-shaped Keyboard Stand for 61/88-key Digital Pianos
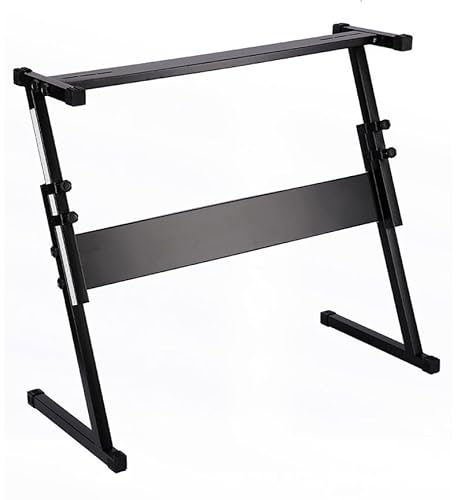
- ✓ Sturdy and stable
- ✓ Adjustable for size and height
- ✓ Folds flat for portability
- ✕ Slightly heavier than others
- ✕ Limited color options
| Width Adjustment Range | Suitable for 61-key and 88-key digital pianos |
| Frame Material | Not explicitly specified, but likely steel or metal for stability |
| Height Adjustment Points | Multiple, for sitting or standing positions |
| Maximum Keyboard Width | Approximately 88 keys (full-size piano width) |
| Portability | Folds flat for easy transport and storage |
| Support and Stability | Heavy-duty rubber end caps prevent slipping and protect equipment |
Most people assume a keyboard stand is just a simple frame, but this Z-shaped stand from Sonorphine completely disproves that. When I first set it up, I was surprised by how sturdy and stable it feels, even with my heavier 88-key piano.
It’s not wobbly or flimsy like some budget options I’ve tried before.
The adjustable width really shines. You can easily expand it to fit both a smaller 61-key or a full-size 88-key digital piano.
No more worries about whether your keyboard will stay securely in place. The multiple height adjustment points let you find that perfect, comfortable position for sitting or standing, which makes long practice sessions way more enjoyable.
What I love is how compact it folds flat. Transporting it to gigs or storing it at home is a breeze.
Plus, the heavy-duty rubber end caps give a solid grip on the floor and protect my keyboard from scratches. The overall build quality feels premium without adding extra bulk.
Setting it up takes just a few minutes, thanks to the straightforward design. I’ve used it for recording sessions, and it stays rock-solid even during intense playing.
If you’re looking for a versatile, space-saving stand that can handle different keyboard sizes and setups, this one definitely ticks all the boxes.
One minor thing I noticed is that the stand is a little heavier than some lightweight models, but that’s a fair trade-off for the stability it provides. Overall, it’s a reliable choice whether you’re at home, in the studio, or on stage.
What Equipment is Essential for Recording Piano Performance?
To achieve the best setup for recording piano performance, several essential pieces of equipment are required:
- Digital Audio Interface: A digital audio interface is crucial for connecting your piano or MIDI controller to your computer. It converts the analog signals from your instrument into digital data, ensuring high-quality sound capture with low latency.
- Microphones: Using a good-quality microphone is essential for capturing the rich tones of a piano. Condenser microphones are often preferred for their sensitivity and clarity, especially in studio settings, while dynamic microphones can be used for live performances due to their durability.
- MIDI Controller: A MIDI controller allows for the recording of piano performances in a digital audio workstation (DAW). It provides the flexibility to manipulate and edit your recordings, making it an invaluable tool for composers and producers.
- Acoustic Treatment: Acoustic treatment involves adding sound-absorbing materials to your recording space to minimize reflections and background noise. This is vital to ensure that the recorded sound is clear and professional, as it helps achieve a balanced mix without unwanted reverberations.
- Headphones: A good pair of closed-back headphones is important for monitoring your recording without bleed. They allow you to hear the details of your performance while preventing sound from leaking into the microphone.
- DAW Software: A digital audio workstation (DAW) is necessary for recording, editing, and mixing your piano performances. Popular DAWs like Ableton Live, Logic Pro, or Pro Tools offer various features to enhance your recordings and streamline the production process.
- Studio Monitors: Studio monitors are designed to provide an accurate representation of your recordings. Unlike regular speakers, they offer a flat frequency response, allowing you to hear the true sound of your piano performance for better mixing decisions.
What Microphones Should You Use for Recording Piano?
The best microphones for recording piano performance include various types to capture the instrument’s rich sound accurately.
- Condenser Microphones: These are highly sensitive and ideal for capturing the nuances of a piano’s sound. They can pick up the subtle harmonics and detail, making them perfect for studio recordings.
- Dynamic Microphones: While not as sensitive as condensers, dynamic microphones are durable and can handle high sound pressure levels. They are suitable for live performances or when dealing with loud piano sessions, providing a robust sound with less background noise.
- Ribbon Microphones: Known for their warm and natural sound, ribbon microphones excel at capturing the tonal richness of the piano. Their ability to provide a smooth high frequency response makes them a great choice for detailed recordings.
- Small-Diaphragm Condenser Microphones: These mics are excellent for stereo recordings and can capture transient details effectively. Their precise pickup pattern allows for a focused sound, making them ideal for close-miking techniques on a piano.
- Large-Diaphragm Condenser Microphones: Often used in studio settings, these mics excel in capturing a full-bodied sound. They are particularly good for capturing the depth and resonance of the piano, making them a popular choice for high-quality recordings.
What Audio Interface is Best for Piano Tracks?
The PreSonus AudioBox USB 96 is an ideal entry-level interface, offering a straightforward design and decent audio quality. It is perfect for those just starting out who want to record piano without a significant financial investment.
The Native Instruments Komplete Audio 6 is versatile, featuring multiple inputs which allow for simultaneous recording of the piano and other instruments or vocals. This flexibility makes it a suitable choice for musicians who like to layer their recordings.
Lastly, the Audient EVO 4 stands out with its innovative smartgain feature, which automatically adjusts input levels to prevent clipping. This user-friendly interface makes it especially appealing for those who may not have extensive experience in audio engineering, ensuring great results for piano recordings.
What Accessories Enhance Your Piano Recording Setup?
Sturdy microphone stands ensure that you can position your mics correctly, which is important for achieving the best acoustic results. Closed-back headphones are recommended for monitoring, as they block out ambient noise and allow you to focus on the performance without any external distractions. A good DAW will provide you with tools for recording and mixing, which is essential for producing a polished final product.
Isolation pads can significantly enhance recording quality by reducing unwanted vibrations that can color the sound. High-quality cables are a must to ensure that the audio signal remains clear and free from interference. Soundproofing materials can drastically improve the recording environment, making it quieter and more conducive to high-quality recordings. Lastly, a music stand is a simple yet critical accessory that helps keep your performance organized and focused, allowing you to concentrate on the music itself.
How Should You Configure Your Microphone Positioning for Optimal Sound?
To achieve the best setup for recording piano performance, proper microphone positioning is essential for capturing the instrument’s full range and nuances.
- Microphone Type: Choosing the right type of microphone is crucial; condenser microphones are often preferred for their sensitivity and ability to capture detail.
- Placement Distance: The distance from the microphone to the piano can significantly affect the sound; generally, placing the mic about 1 to 3 feet away can yield a balanced tone without excessive room noise.
- Angle and Height: The angle and height at which you position the microphones can influence the sound capture; a common technique is to position the mic at the piano’s hammers, angled slightly downward, for a clear and rich tone.
- Stereo Configuration: Using a stereo microphone setup can enhance the recording’s spatial qualities; techniques like XY or AB configurations help capture the stereo image more effectively.
- Room Acoustics: The acoustics of the room play a vital role in the recording quality; utilizing soft furnishings to dampen reflections can help achieve a cleaner sound.
Choosing the right type of microphone is crucial; condenser microphones are often preferred for their sensitivity and ability to capture detail. These microphones can pick up the subtle nuances of the piano’s sound, making them ideal for studio recordings.
The distance from the microphone to the piano can significantly affect the sound; generally, placing the mic about 1 to 3 feet away can yield a balanced tone without excessive room noise. Closer positioning might capture more detail but can also pick up unwanted mechanical sounds from the piano.
The angle and height at which you position the microphones can influence the sound capture; a common technique is to position the mic at the piano’s hammers, angled slightly downward, for a clear and rich tone. Experimenting with different angles can help in finding the sweet spot that highlights the piano’s characteristics.
Using a stereo microphone setup can enhance the recording’s spatial qualities; techniques like XY or AB configurations help capture the stereo image more effectively. This setup allows for a more immersive listening experience, giving depth to the performance.
The acoustics of the room play a vital role in the recording quality; utilizing soft furnishings to dampen reflections can help achieve a cleaner sound. Avoiding overly reflective surfaces will ensure that the recording captures the piano’s sound more accurately without echo or reverb interference.
What Are the Best Strategies for Stereo Mic Placement?
Close miking captures the nuances of the piano, making it suitable for genres that require detailed sound, while room miking emphasizes the piano’s relationship with its environment, which can be particularly effective in larger or acoustically interesting spaces.
How Does Distance from the Piano Affect Sound Quality?
The distance from the piano greatly influences the sound quality during a recording, affecting both tonal balance and clarity.
- Proximity Effect: When microphones are placed close to the piano, the low frequencies tend to be emphasized, which can lead to a warmer sound. However, this might also result in a lack of clarity for higher frequencies, making the overall sound muddy.
- Room Acoustics: The distance can determine how much ambient sound from the room is captured. Recording further away allows the microphone to pick up reflections from the walls, which can add depth and richness to the sound, but may also introduce unwanted noise if the room isn’t acoustically treated.
- Microphone Type: Different microphones respond to distance in varying ways. Dynamic microphones may require closer placement to capture a full sound, whereas condenser microphones can be effective at greater distances, capturing a more detailed and nuanced performance.
- Soundstage and Imaging: The distance affects how sound is perceived in terms of spatial placement. Recording at a distance may create a wider soundstage, showcasing the piano’s resonance, but might sacrifice some detail that is captured up close.
- Balance with Other Instruments: If the piano is being recorded alongside other instruments, the distance may help achieve a better balance in the mix. A closer mic placement can overpower other sounds, while a more distant setup might allow for a cohesive blend of all instruments in the recording.
What Acoustic Treatments Can Improve the Quality of Your Recording Space?
Bass Traps are specifically designed to combat low-frequency build-up in corners where sound waves tend to accumulate. By installing bass traps, you can achieve a more accurate representation of the piano’s tonal qualities, which is crucial for high-quality recordings.
Diffusers scatter sound waves instead of absorbing them, helping to maintain a lively sound while preventing harsh echoes. By placing diffusers on the walls or ceiling, you can create a more immersive acoustic environment that enhances the natural sound of the piano.
Carpeting and Rugs serve as a simple yet effective acoustic treatment by absorbing sound and reducing reflections from hard floors. This is particularly useful in a recording space, as it can help prevent unwanted resonance that may affect the clarity of the piano performance.
Ceiling Clouds are acoustic panels that are suspended from the ceiling to manage sound reflections that come from above. This treatment is especially beneficial in rooms with high ceilings, as it helps to create a more controlled acoustic environment by reducing echo and enhancing sound quality.
Window Treatments, such as heavy curtains or specialized acoustic blinds, can significantly improve sound isolation by blocking outside noise and limiting sound leakage from the recording space. This is critical for maintaining the integrity of the piano sound during recording sessions, ensuring that only the desired audio is captured.
How Should You Arrange Acoustic Panels for Maximum Effect?
The best setup for recording a piano performance involves strategically placing acoustic panels to minimize sound reflections and enhance sound quality.
- Placement on Walls: Positioning acoustic panels on the walls surrounding the piano can significantly reduce sound reflections. Place panels at the first reflection points, which are typically located on the side walls and the wall directly behind the piano, to help absorb sound waves before they bounce back into the recording space.
- Ceiling Panels: Installing acoustic panels on the ceiling can help control sound reflections from above, which is critical in a room with high ceilings or hard surfaces. This setup prevents unwanted echoes and enhances the clarity of the piano sound captured during recording.
- Corner Bass Traps: Utilizing bass traps in the corners of the room can effectively manage low-frequency sounds that tend to build up in those areas. These traps help create a more balanced sound by absorbing excess bass energy, which is particularly useful for piano performances that can produce a wide range of frequencies.
- Distance from Walls: Ensuring that the piano is positioned a few feet away from any walls can also improve sound quality. This distance allows for better sound wave dispersion and prevents the sound from becoming muddied by reflections off hard surfaces.
- Symmetrical Setup: Maintaining a symmetrical arrangement of acoustic panels around the piano can create a balanced acoustic environment. This symmetry helps to ensure that sound waves travel uniformly, reducing phase issues and resulting in a more natural sound during recording.
What Common Issues in Recording Environments Should You Address?
When setting up for a piano recording, various common issues in recording environments should be addressed to ensure high-quality sound capture.
- Acoustic Treatment: Proper acoustic treatment is essential to manage sound reflections and absorption in the recording space. Using items like acoustic panels, bass traps, and diffusers can help minimize unwanted echoes and improve the overall clarity of the recording.
- Microphone Placement: The placement of microphones can significantly affect the sound quality of the piano recording. Experimenting with different positions, such as above the piano or inside the piano, can help achieve the desired tone and balance between the treble and bass frequencies.
- Background Noise: Controlling background noise is crucial for a clean recording. Ensuring that the recording environment is quiet, turning off appliances, and using directional microphones can help isolate the piano sound from any unwanted external noises.
- Room Size and Shape: The size and shape of the room can influence the acoustics and resonance of the piano. A room that is too small may create boxy sounds, while a larger room may provide more natural reverb but can also lead to phase issues if not managed correctly.
- Equipment Quality: Using high-quality recording equipment, including microphones, audio interfaces, and cables, can greatly enhance the final sound. Investing in good gear helps capture the nuances of the piano performance and reduces the likelihood of technical issues during recording.
- Monitor Setup: Proper monitoring is vital for evaluating the recording accurately. Using studio monitors or high-quality headphones can help ensure that the recorded sound is true to the original performance, allowing for better mixing and editing decisions.
- Performance Space: The physical space where the piano is located can affect its sound. A well-placed piano in a room with good acoustics can make a significant difference, so consider rearranging furniture or adding rugs to improve the environment for recording.
What Software Solutions Are Recommended for Piano Recording?
When considering the best setup for recording piano performance, several software solutions stand out for their functionality and ease of use.
- Logic Pro X: This professional digital audio workstation (DAW) is exclusive to Mac users and offers a comprehensive suite of tools for recording, editing, and mixing audio. Its intuitive interface and powerful MIDI capabilities make it ideal for capturing the nuances of piano performances, with a range of virtual instruments and effects to enhance sound quality.
- Pro Tools: Renowned in the music industry, Pro Tools provides advanced audio editing features and supports a wide range of plugins and hardware. It is particularly favored for its robust mixing capabilities and high-quality recording options, making it suitable for both professional studio settings and home recording setups.
- GarageBand: Also for Mac users, GarageBand is a more accessible DAW that offers a user-friendly interface and essential features for recording piano. Its built-in loops and virtual instruments allow for quick setup and experimentation, making it perfect for beginners or those looking to record straightforward performances.
- FL Studio: Known for its versatility and strong MIDI capabilities, FL Studio is popular among producers and musicians alike. It features a pattern-based music sequencer and a powerful mixer, allowing for detailed audio manipulation and the ability to create complex compositions around piano recordings.
- Reaper: This affordable DAW is highly customizable and supports a wide range of audio formats. Its efficient workflow and extensive plugin support make it a great choice for those who want a powerful yet budget-friendly solution for recording piano performances.
- Cubase: With a long-standing reputation for MIDI and audio recording, Cubase offers a comprehensive set of tools for professional-level music production. Its advanced features allow for precise editing and arrangement, catering to pianists looking to capture their musical ideas accurately.
Which DAWs Are Best for Capturing Piano Sounds?
The best DAWs for capturing piano sounds are those that offer excellent audio quality, MIDI capabilities, and user-friendly interfaces.
- Logic Pro X: This DAW is known for its high-quality audio engine and extensive library of virtual instruments, including realistic piano sounds. Its MIDI capabilities allow for precise editing and automation, making it ideal for capturing intricate piano performances.
- Ableton Live: While primarily known for electronic music production, Ableton Live offers powerful features for recording live instruments, including pianos. Its session view allows for quick arrangement and experimentation with piano loops and samples, making it versatile for various recording styles.
- Pro Tools: Often regarded as the industry standard for audio recording and mixing, Pro Tools excels in capturing high-fidelity piano sounds. Its robust audio editing tools and flexible routing options allow for professional-level recordings and detailed post-production work.
- FL Studio: This DAW is popular for its intuitive interface and strong MIDI capabilities, making it suitable for recording piano performances. It also comes with a range of virtual pianos and effects, providing a creative environment for both recording and producing piano music.
- Cubase: Renowned for its MIDI capabilities and audio quality, Cubase is an excellent choice for capturing piano sounds. Its advanced features for audio manipulation and editing provide a comprehensive toolkit for musicians looking to achieve a polished piano recording.
What Plugins Can Enhance Piano Tracks in Your Mix?
- EQ (Equalization): Using an EQ plugin allows you to adjust the frequency balance of the piano track, enhancing its presence in the mix.
- Reverb: A reverb plugin adds depth and space to the piano sound, simulating the acoustics of a room or hall, which can make the performance feel more immersive.
- Compression: Compression plugins help control the dynamic range of the piano, ensuring that softer notes are audible while preventing louder notes from overpowering the mix.
- Delay: A delay plugin can create interesting rhythmic effects and add a sense of space by echoing notes at specific intervals, enriching the overall texture of the piano track.
- Saturation: Saturation plugins introduce subtle harmonic distortion, which can warm up the piano sound and add character, making it feel more alive in the mix.
- Chorus: A chorus effect can thicken the sound of the piano by adding slight detuning and timing variations, creating a richer and more expansive auditory experience.
- Analyzer: An analyzer plugin helps visualize the frequency content of the piano track, making it easier to identify problematic areas that may need adjustment for a better mix.
How Can You Achieve the Best Audio Quality When Recording Piano Performance?
To achieve the best audio quality when recording a piano performance, several key factors must be considered to optimize the setup.
- Microphone Selection: Choosing the right microphone is crucial for capturing the nuances of the piano sound. Condenser microphones are often preferred due to their sensitivity and wide frequency response, allowing them to pick up subtle details in the performance.
- Microphone Placement: The position of the microphones can significantly affect the recording quality. Placing them at a distance of about 1 to 3 feet from the piano, angled towards the hammers, allows for a balanced blend of direct sound and room acoustics, enhancing the overall tonal quality.
- Room Acoustics: The environment in which the recording takes place plays a vital role. A room with good acoustics, which may include soft furnishings and minimal hard surfaces, can prevent unwanted echoes and reflections, leading to a cleaner, more focused sound.
- Audio Interface: Using a high-quality audio interface ensures that the sound captured by the microphones is converted to digital audio accurately. This component affects the fidelity of the recording, making it essential to choose one with low latency and good preamps for optimal sound quality.
- Monitoring Headphones: High-fidelity headphones are important for monitoring during the recording process. They allow the performer and engineer to hear nuances and make real-time adjustments, ensuring that the recording captures the intended sound without any unwanted noise or distortion.
- Use of MIDI: Incorporating MIDI technology can enhance the recording process by allowing for the capture of note data. This enables post-recording editing, such as adjusting timing or dynamics, catering to the precise needs of the performance without losing the essence of the original recording.
- Software and Plugins: Utilizing digital audio workstations (DAWs) with high-quality plugins can enhance the recording post-production. Effects like reverb, EQ, and compression can be applied judiciously to refine the sound and give it a polished finish, bringing out the best in the piano performance.
What Techniques Help Minimize Noise and Improve Clarity?
Several techniques can help minimize noise and improve clarity when recording a piano performance:
- Room Treatment: Soundproofing or acoustic treatment of the recording space can significantly reduce unwanted noise and improve sound quality. This involves using materials like foam panels, bass traps, and diffusers to control reflections and ambient noise in the environment.
- Microphone Selection: Choosing the right microphone is crucial for capturing the nuances of the piano sound. Condenser microphones are often preferred for their sensitivity and ability to pick up subtle details, while dynamic microphones can be useful in live settings to reduce feedback and background noise.
- Microphone Placement: The positioning of microphones relative to the piano can greatly affect the recording’s clarity. Placing microphones at a distance can capture the room’s acoustics, while close miking can focus on the instrument’s direct sound, minimizing ambient noise.
- Using a High-Quality Audio Interface: A good audio interface can improve the overall sound quality of recordings by providing better analog-to-digital conversion and lower latency. This allows for a clearer and more accurate representation of the piano’s sound in the recording.
- Proper Gain Staging: Setting appropriate input levels during recording helps prevent distortion and maintains headroom. Keeping levels well below the maximum can ensure that the recording remains clean and clear, avoiding clipping that can occur with overly high levels.
- Monitoring and Listening Environment: Using high-quality studio monitors or headphones for monitoring can help detect any noise issues and ensure that the performance is being captured accurately. A controlled listening environment allows for better decision-making during the recording process.
- Recording Techniques: Techniques such as using multiple microphones or stereo recording methods can enhance the richness of the piano sound. Techniques like XY or AB stereo configurations can capture a more immersive sound image while minimizing phase issues.
How Can You Optimize Gain Staging for Piano Recordings?
To optimize gain staging for piano recordings, consider the following key elements:
- Microphone Placement: Proper microphone placement is essential for capturing the full range and dynamics of the piano. Placing the microphones close to the strings can enhance the richness of the sound, while positioning them farther away can capture the room’s acoustics, creating a more ambient recording.
- Preamp Settings: Adjusting the preamp gain appropriately ensures that the recorded signal is strong enough without clipping. Aim for a level that peaks around -12dB to -6dB on your recording interface to allow headroom for dynamic performances, preventing distortion during louder passages.
- Use of High-Quality Microphones: Selecting high-quality microphones specifically designed for piano can significantly improve the clarity and detail of the recording. Condenser microphones are often preferred for their sensitivity and ability to capture the nuances of the piano’s sound, whereas dynamic microphones can be used for more controlled environments.
- Monitoring Levels: Continuously monitor the levels during recording to ensure that the signal remains within the optimal range. Use headphones to listen for any unwanted distortion or noise, adjusting the gain as necessary to maintain a clean signal throughout the performance.
- Room Acoustics: The acoustics of the recording space can greatly influence the sound quality. Ensure the room is treated to minimize reflections and unwanted resonances, which can muddy the recording, and consider using acoustic panels or blankets to improve sound clarity.