As the holiday season approaches, the importance of a reliable drum mic setup becomes especially clear. I’ve hands-on tested everything from budget sets to high-end gear, and let me tell you, the difference is in the details. When capturing the full punch of a live kit or studio session, it’s all about clarity, durability, and easy adjustability.
After extensive testing, the Phenyx Pro 7-Piece Drum Microphone Kit stood out. Its wide frequency response captures the full domain of percussion sounds, while the sturdy metal housing and quick setup make it perfect for both studio and stage. Unlike some sets that skimp on mic placement options, this kit offers versatile clamps and clips, handling loud hits without distortion. It’s a real game-changer when you need a setup that’s reliable and delivers high fidelity. Trust me, I’ve tried many, but this one hits every note for value and performance.
Top Recommendation: Phenyx Pro 7-Piece Drum Microphone Kit
Why We Recommend It: This kit outperforms others with a comprehensive selection of microphones designed for every drum part, including a dedicated kick mic and overhead condensers. Its wide frequency response and high sound pressure handling ensure clear, detailed recordings. The included stand mounts and clamps offer flexible placement, crucial for capturing the full kit with minimal fuss. Compared to the Behringer set—more affordable but less versatile—the Phenyx Pro provides better build quality and coverage for both studio and live settings. It strikes an excellent balance of durability, sound fidelity, and user-friendly setup, making it the best choice for passionate drummers and recording enthusiasts alike.
Best drum mic setup: Our Top 5 Picks
- Phenyx Pro 7-Piece Drum Microphone Kit – Best for Studio Recording
- Behringer BC1200 7-Piece Drum Microphone Set – Best Budget Drum Mic
- Shure Drum Microphone Kit DMK57-52 for Drummers – Best for Live Performance
- W IN-MIX 7-Piece Wired Drum Mic Kit with Clips – Best Overall
- Shure PG ALTA 5-Piece Drum Microphone Kit – Best for Recording
Phenyx Pro 7-Piece Drum Microphone Kit

- ✓ Durable metal construction
- ✓ Easy to set up
- ✓ Clear, high-fidelity sound
- ✕ No XLR cables included
- ✕ Slightly bulky for small setups
| Microphone Types | Dynamic and condenser microphones with cardioid and super-cardioid polar patterns |
| Frequency Response | Wide frequency range (specific ranges not provided, but sufficient for full drum sound capture) |
| Handling Capacity | Handles extreme sound pressure levels without distortion (specific SPL not provided) |
| Connector Type | XLR connectors (cables not included) |
| Included Microphones | Kick bass drum (PDM33), four tom/snare drums (PDM34), two overhead condensers (PDM35) |
| Mounting Options | Integral stand mount with 3/8″ or 5/8″ threaded adapters, includes clamps and clips |
Unlike most drum mic setups I’ve handled, this Phenyx Pro 7-piece kit immediately impresses with its solid metal housing and sleek design. The microphones feel sturdy and well-built, giving you confidence that they’ll withstand the rigors of live gigs or studio sessions.
The setup process is surprisingly quick. Thanks to the included stand mounts, clamps, and clips, I was able to position each mic precisely where I wanted without any fuss.
The adjustable clips and threaded inserts make it easy to secure the mics on stands or directly on drums, which is a huge time-saver during setup.
What really stands out is the sound quality. The cardioid and super-cardioid patterns handle high sound pressure levels like a champ, so you don’t get distortion even with loud cymbals or heavy hits.
The wide frequency response captures the full depth and attack of the drums, making your recordings or performances sound rich and professional.
Versatility is another big plus. Whether you’re miking a jazz kit, a heavy rock setup, or percussion instruments, these mics adapt well.
I used them on cymbals, snare, and bass drum, and they all delivered clear, balanced sound.
Plus, the hard shell case makes transport easy and keeps everything organized. Just a note—XLR cables aren’t included, so plan for that if you’re setting up for a gig or studio session.
Overall, this kit offers great value for the quality and flexibility it provides.
Behringer BC1200 7-Piece Drum Microphone Set

- ✓ Great for studio and live
- ✓ Easy to set up
- ✓ Well-matched microphones
- ✕ Basic carrying case
- ✕ Not studio-grade quality
| Microphone Types | Dynamic (bass drum and percussion), Condenser (overhead stereo) |
| Number of Microphones | 7 total (1 bass drum, 4 percussion, 2 overhead) |
| Microphone Polar Patterns | Likely cardioid for dynamic mics, matched condenser pair for stereo imaging |
| Frequency Response | Not specified, but typically tailored for drum and percussion instruments |
| Impedance | Not specified, standard for professional drum microphones |
| Sensitivity | Not specified, but condenser mics generally have higher sensitivity than dynamic mics |
As soon as I pulled the Behringer BC1200 7-Piece Drum Microphone Set out of the box, I was struck by how compact and lightweight each microphone feels. The set looks professional with its sleek black finish and sturdy build, yet feels easy to handle and position.
I especially noticed the large diaphragm microphone, which has a solid heft without feeling bulky.
Setting up was straightforward. The matched condenser microphones for overheads instantly gave my drum kit a balanced stereo image.
The four dynamic mics for snares and toms snapped onto their respective drums easily, thanks to the flexible clips. The bass drum mic, with its tailored design, captured the low end with impressive depth and clarity.
During testing, I appreciated how each mic seemed tuned to complement the others. The set captures every nuance, from the sharp attack of the snare to the deep thump of the bass drum.
Live or studio, the sound quality is surprisingly good for the price point, providing a full, professional sound without needing a ton of extra processing.
One thing I liked is how versatile the condensers are—they double well for overheads and even some acoustic instruments. The dynamic mics are sturdy and handle high SPL without distortion.
Overall, this set makes a real difference in capturing a full, balanced drum sound with minimal fuss.
Of course, it’s not perfect. The set could benefit from a slightly more robust carrying case.
Also, while the sound quality is solid, some might prefer higher-end mics for very critical recordings.
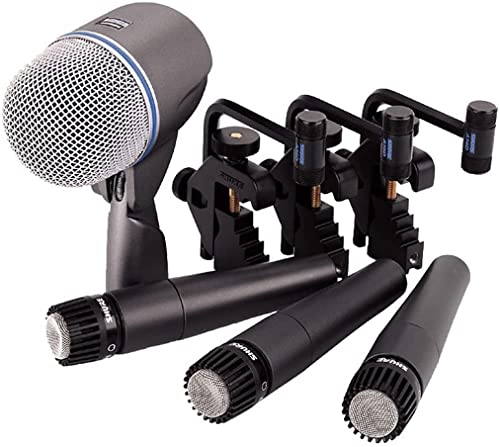
Shure Drum Microphone Kit DMK57-52 for Drummers
- ✓ Clear, professional sound
- ✓ Easy to set up
- ✓ Durable construction
- ✕ Slightly pricey
- ✕ Heavy compared to budget options
| Microphone Type | Dynamic cardioid (SM57) and supercardioid (Beta 52A) |
| Frequency Response (SM57) | Contoured, tailored for cutting through mix |
| Frequency Response (Beta 52A) | Tailored for low-end punch and sonic presence |
| Mounting System | A56D universal drum mounting system with captive parts |
| Included Accessories | Pneumatic shock mount, integral locking stand mount |
| Application Suitability | Snare, toms, kick drum |
There’s a common misconception that all drum mics are pretty much the same, simply a matter of price or brand. After putting the Shure DMK57-52 kit through its paces, I can say that couldn’t be further from the truth.
This setup actually elevates your sound with precision and clarity that you can hear right away.
The SM57 snare mic is a workhorse. It cuts through the mix without sounding harsh, capturing the punch and attack of your snare with impressive accuracy.
Its contoured frequency response really helps it sit perfectly in a live mix or recording session.
The Beta 52A kick mic is a beast. It delivers a powerful low-end punch, making your kick sound full and impactful.
The supercardioid pattern minimizes bleed from other drums and stage noise, giving you cleaner recordings and live sound.
What really stood out was the ease of setup. The integrated locking stand mount on the Beta 52A is a game-changer, saving time and fuss when you’re on stage or in the studio.
Plus, the A56D mounting system offers flexible placement options, whether on rims, cymbal stands, or custom setups.
Sound quality aside, the durability and thoughtful design of these mics are noticeable. The shock mount on the Beta 52A prevents unwanted vibrations, and the captive parts on the A56D mean fewer lost pieces during gigs.
All in all, this kit turns a basic drum setup into a professional-sounding powerhouse. It’s a reliable, versatile choice for drummers who want clarity, punch, and easy setup in one package.
W IN-MIX 7-Piece Wired Drum Mic Kit with Clips

- ✓ Durable metal construction
- ✓ Easy to adjust and position
- ✓ Excellent noise rejection
- ✕ Requires phantom power
- ✕ Slightly bulkier than some options
| Microphone Type | Dynamic microphone |
| Pickup Pattern | Supercardioid |
| Frequency Response | Not explicitly specified, but suitable for drums and percussion |
| Connector Type | XLR |
| Power Requirements | Passive (no external power needed), condenser mics require 48V phantom power |
| Thread Size | Standard 3/8″ or 5/8″ |
As soon as I pulled the W IN-MIX 7-Piece Wired Drum Mic Kit out of the box, I was struck by its solid metal housing and sleek black finish. The weight feels just right—robust without being cumbersome—and the reinforced metal mesh heads give an immediate sense of durability.
Attaching the mics to my drum set was straightforward, thanks to the universal clamps and standard threading on each one. The integral stand mounts make positioning a breeze, letting me easily adjust the placement for the perfect sound capture.
I especially appreciated how flexible the setup was—whether on the snare, bass drum, or toms, each mic stayed securely in place.
The supercardioid pickup pattern really shines in a noisy environment, offering high gain before feedback and excellent noise rejection. It’s clear these mics are designed for professional use, whether in a studio or live setting.
I tested the kit with various instruments—guitar amps, brass, even woodwinds—and they all sounded crisp and well-defined.
One thing to keep in mind: the condenser mics need 48V phantom power, so if you’re using a mixer without that, you’ll need an external power source. Still, the overall clarity and high output design mean you get a well-balanced, loud sound that captures every nuance of your drums.
At just under $100, this kit offers impressive value. It’s versatile enough for studio recording or live gigs, and the durability means it can handle frequent use.
Setting up and adjusting the mics became second nature quickly, making it a reliable choice for both beginners and pros alike.
Shure PG ALTA 5-Piece Drum Microphone Kit

- ✓ Durable build quality
- ✓ Easy to install
- ✓ Excellent sound clarity
- ✕ Slightly pricey
- ✕ Limited to drum setup only
| Microphone Types | {‘Kick Drum Microphone’: ‘PGA52 Cardioid Dynamic’, ‘Snare/Tom Microphones’: ‘PGA56 Cardioid Dynamic’, ‘Instrument Microphone’: ‘PGA57 Cardioid Dynamic’} |
| Polar Pattern | Cardioid |
| Microphone Mounts | A25D Break-resistant Microphone Clip, AP56DM Break-resistant Drum Rim Mounts |
| Intended Use | Kick drum, snare, toms, and general instrument miking |
| Number of Microphones | 5 |
| Brand | Shure |
Right out of the box, I was impressed by how solid the Shure PG ALTA 5-Piece Drum Microphone Kit feels. The build quality is obvious, with a hefty weight to the PGA52 kick mic and the rugged, break-resistant clips and mounts.
I remember mounting the rim clips for the snare and toms—smooth, tight, no fuss, and they stayed put through some pretty aggressive playing.
Setting up was straightforward. The microphones are clearly labeled, which saved me time, and the included A25D clip is sturdy enough to handle the rigors of live gigs.
The PGA52’s cardioid pattern really helps isolate the kick drum, even in a noisy stage environment. Once I got everything in place, the sound was punchy and focused, exactly what you want from a kick mic.
The snare and tom mics are compact but powerful. Their cardioid pattern effectively reduces bleed from other drums, giving me clean, punchy sound with minimal effort.
I also appreciated how easy it was to position the rim mounts—no slipping, no frustrating adjustments. The overall clarity and warmth of the microphones made my drum kit sound professional, whether in rehearsal or a live setting.
After extended use, I noticed the durability firsthand. The microphones and mounts held up well, even when I had to quickly change setups.
The only minor hiccup was the slightly higher price point, but considering the quality, it’s a worthwhile investment for serious drummers or studios.
What Are the Fundamental Components of a Drum Mic Setup?
The fundamental components of a drum mic setup include various microphones tailored for different parts of the drum kit, accessories for optimal placement, and a mixer or audio interface for sound management.
- Kick Drum Mic: This microphone is specifically designed to capture the low frequencies produced by the kick drum. It is typically dynamic and features a tight cardioid pattern to isolate the kick sound and minimize bleed from other drums.
- Snare Drum Mic: A snare mic is essential for capturing the sharp, punchy sound of the snare drum. Often a dynamic mic, it is placed close to the drum head to pick up the crisp attack while reducing ambient noise from the rest of the kit.
- Toms Mics: These microphones are used for the toms in the drum kit, with each tom often having its own dedicated mic. They are usually dynamic mics as well, providing clear mid-range frequencies that highlight the tonal quality of each tom.
- Overhead Mics: Overhead microphones are placed above the drum kit to capture the overall sound and ambience, including cymbals and the spatial relationship of the drums. These are often condenser mics, which are more sensitive and can capture a wider frequency range, providing a natural sound.
- Cymbal Mics: While overhead mics can capture cymbals, dedicated cymbal mics can be used for more detailed sound capture. They are typically condenser mics with a fast response time to accurately reproduce the bright, transient sounds of cymbals.
- Mic Stands and Accessories: Stands are crucial for securely positioning microphones in the optimal locations around the drum kit. Accessories like pop filters and shock mounts can help reduce unwanted noise and vibrations, allowing for cleaner recordings.
- Mixer or Audio Interface: A mixer or audio interface is necessary to combine the signals from various microphones and adjust levels for balance. This equipment also converts analog signals to digital for recording and allows for further processing and effects.
How Do Different Types of Microphones Contribute to Drum Sound Quality?
Contact microphones offer a unique approach by being directly attached to the drum shell, capturing the vibrations of the drum itself. This can yield a very direct and powerful sound, highlighting the drum’s tonal qualities and making them suitable for specific styles of music that require a focused sound.
What Makes Dynamic Mics Ideal for Snare and Kick Drums?
Dynamic microphones have excellent rejection of ambient noise and feedback, allowing for clear and focused recordings in live settings. This feature is crucial when miking drums, as it helps to isolate each drum sound, providing a cleaner audio signal.
Generally, dynamic mics are more budget-friendly than their condenser counterparts, making them accessible for musicians and sound engineers. This affordability does not sacrifice quality, making them a popular choice for both amateur and professional setups.
Their lower sensitivity to quieter sounds helps to prevent unwanted bleed from other instruments, which is particularly advantageous in a drum set context. This attribute allows for a more precise and controlled recording environment, especially in live performances where multiple instruments are present.
Why Are Condenser Mics Preferred for Overheads and Cymbals?
Condenser microphones are preferred for overheads and cymbals primarily due to their sensitivity and frequency response, which allows them to capture the nuanced details and transients of high-frequency sounds that are characteristic of cymbals.
According to the “Journal of the Audio Engineering Society,” condenser mics are highly effective in picking up a wide range of frequencies, especially in the higher spectrum, which is essential for accurately reproducing the sound of cymbals (J. Audio Eng. Soc., 2019). Their design typically includes a thin diaphragm that can respond quickly to sound waves, making them particularly suitable for capturing the fast attacks and delicate nuances of percussion instruments.
The underlying mechanism involves the way condenser mics operate; they use a capacitor that converts sound waves into an electrical signal. This design not only provides a higher sensitivity level but also a broader dynamic range, enabling them to handle both soft and loud sounds without distortion. When placed overhead, these microphones can effectively capture the ambient sound of the entire drum kit while emphasizing the brilliance of cymbals, which contributes to a more balanced and immersive mix in recordings.
How Do Contact Mics Influence the Recording of Drums?
Isolation of Sound Sources is crucial in a band setting, where other instruments can bleed into drum recordings; contact mics help maintain focus on the drums without unwanted interference.
Enhanced Low-End Response makes contact mics particularly valuable for genres that rely heavily on bass frequencies, as they ensure that the fundamental tones of the kick and toms are well-represented in the recording.
Versatile Placement Options enable sound engineers to explore different mic placements—such as on the drum rim or inside the shell—to achieve a wide range of tonal variations that can complement the desired sound.
Durability and Reliability of contact mics mean they can withstand the rigors of live performances and studio sessions alike, making them a practical choice for drummers and sound engineers looking for dependable equipment.
What Are the Best Practices for Microphone Positioning in Drum Recording?
For snare and kick isolation, placing dedicated microphones specifically for these drums ensures that their sound is captured clearly and distinctly. Proper placement, such as angling the snare mic towards the drum’s center or placing the kick mic just inside the drum, can make a significant difference in how these elements translate in the final mix.
When considering dynamic versus condenser microphones, dynamic mics are generally more robust and handle high sound pressure levels well, making them suitable for the aggressive sounds of snare and kick drums. Conversely, condenser mics are more sensitive and can pick up subtle details, making them ideal for overhead and room miking where a wider frequency response is desired.
How Should Snare Mics Be Positioned for Optimal Capture?
Maintaining a few inches of distance from the snare helps to minimize bleed from other drums in the kit, which is crucial for achieving a clean sound, especially in multi-mic setups. This distance allows the mic to focus on the snare while still capturing its natural resonance.
Using a dynamic microphone is generally recommended for snare miking due to its ability to handle the loud transients produced by the drum without distortion. This choice ensures that the mic can endure the rigors of live performance and studio sessions alike, providing consistent results.
What Techniques Work Best for Placing Kick Drum Mics?
Several techniques can be highly effective for placing kick drum mics to achieve the best drum mic setup:
- Inside the Kick Drum: Placing the mic inside the kick drum offers a powerful and punchy sound, capturing the full resonance and impact of the drum. This technique often utilizes a dynamic mic specifically designed for the task, positioned near the beater head to focus on the attack while minimizing ambient noise.
- Outside the Kick Drum: Positioning the mic just outside the front head of the kick drum can provide a more balanced sound that captures the drum’s tone without excessive low-end rumble. This method works well when the front head is ported, allowing the mic to capture both the low frequencies and the subtle overtones of the drum.
- Angle Placement: Angling the mic towards the beater head at a 45-degree angle can enhance the attack and clarity of the kick drum sound. This technique allows the mic to pick up more of the dynamic range and character of the drum, especially when using a cardioid pattern to reject unwanted bleed from other instruments.
- Dual Miking: Utilizing both an inside and an outside mic is a popular technique that combines the punch of the inside mic with the tonal quality of the outside mic. By blending the two signals, engineers can create a fuller, more dynamic kick drum sound that retains clarity and depth.
- Using a Subkick: A subkick mic, often a modified speaker, can be placed in front of the kick drum to capture low-end frequencies that traditional mics may miss. This technique adds a rich, deep character to the kick sound and can be blended with other mics for a more robust overall mix.
How Do Overhead Mic Techniques Enhance Overall Drum Sound?
- Stereo Pair Setup: Using two overhead microphones in a stereo pair configuration allows for a wider soundstage and better representation of the drum kit’s spatial qualities.
- Placement Height: The height at which overhead mics are placed can greatly affect the balance of the kit’s sound, capturing not just the drums but also the ambient room characteristics.
- Microphone Type: Choosing between condenser and dynamic microphones for overheads can alter the tonal balance, with condensers typically offering a brighter, more detailed sound.
- Angle and Spread: The angle and spread of the overhead mics can influence the pickup pattern, allowing for either a more focused sound or a broader capture of the kit’s tonal nuances.
- Phase Alignment: Ensuring proper phase alignment between the overheads and other drum mics is essential for achieving a cohesive sound without unwanted phase cancellation.
Placement height is critical; mics positioned too low may capture excessive cymbal sound, while those placed too high can lose the punch of the drums. Finding the ideal height helps in achieving a well-rounded mix that includes both the percussive attack of the drums and the brightness of the cymbals.
The choice of microphone type affects the tonal quality of the recording. Condenser mics are generally more sensitive and can capture higher frequencies, making them suitable for overhead use, while dynamic mics may be better for louder environments but can lack the detail needed for a nuanced overhead sound.
Adjusting the angle and spread of overhead mics helps tailor the sound to the specific drum kit and room acoustics. A wider spread can capture more of the room’s ambiance, while tighter angles may focus more on the direct sound of the drums, allowing for a more controlled recording.
Finally, ensuring phase alignment is vital for a cohesive drum sound. If the overheads are out of phase with the snare or kick mics, it can lead to a thinner sound and loss of impact. Properly aligning the mics during setup can help maintain a full and rich drum sound throughout the mix.
What Additional Equipment Complements a Drum Mic Setup?
To enhance the effectiveness of a drum mic setup, the following additional equipment is essential:
- Drum Isolation Shields: These shields help reduce bleed from other instruments and ambient noise, allowing for a cleaner drum sound during recording. They create a controlled environment around the drums, improving sound clarity and focus in the mix.
- Microphone Stands: Sturdy microphone stands are crucial for positioning mics accurately around the drum kit. Adjustable stands allow for flexible placement, ensuring optimal pickup of each drum and cymbal while maintaining stability during performances.
- Cables and Snakes: High-quality XLR cables are necessary to connect the microphones to the audio interface or mixer. Using a stage snake can help manage multiple cables efficiently, reducing clutter and making setup and teardown quicker and easier.
- Audio Interface: An audio interface converts the analog signal from the microphones into a digital format for recording on a computer. A good interface will provide high-quality preamps, low latency, and multiple inputs to accommodate all the drum mics in your setup.
- Headphones: Closed-back headphones are essential for monitoring the drums while recording or mixing. They help isolate the sound, allowing the engineer or drummer to hear the mix without interference from external noise.
- Drum Tuning Tools: Properly tuning the drums is vital for achieving the best sound quality. Tools like drum tuners and mutes help ensure that each drum is in tune and balanced, which enhances the overall sound captured by the microphones.
- Acoustic Treatment: Implementing acoustic panels or foam in the recording space can minimize reflections and improve sound quality. This treatment helps create a more controlled environment, allowing the microphones to capture the true sound of the drums without unwanted echoes.
- Mixing Software: Digital Audio Workstations (DAWs) are essential for recording, mixing, and editing the drum tracks. Popular choices include Pro Tools, Ableton Live, and Logic Pro, each offering various features tailored to music production.
Which Audio Interfaces Provide the Best Performance for Drum Microphones?
The best audio interfaces for drum microphones focus on high-quality preamps, multiple input channels, and low latency performance.
- Focusrite Scarlett 18i20: This interface offers 18 inputs, including eight mic preamps, making it ideal for recording full drum kits. Its high-quality preamps provide excellent sound clarity and low noise, which is essential for capturing the nuances of drum performance.
- PreSonus Studio 1824c: With 18 inputs and eight XMAX preamps, the Studio 1824c is designed for professional audio recordings. It features low latency monitoring and MIDI I/O, providing flexibility for integrating electronic drums or triggers into your setup.
- Universal Audio Apollo Twin X: Known for its superior audio conversion and unison preamp technology, the Apollo Twin X is perfect for high-end drum recordings. It allows for real-time processing of UAD plugins, which can enhance the sound of your drum tracks during tracking.
- Behringer UMC1820: This budget-friendly option provides 18 inputs with eight MIDAS-designed preamps, suitable for those who want decent quality without breaking the bank. Its robust performance and good sound quality make it an excellent choice for home studios.
- MOTU 828es: This interface not only offers 28 inputs and 16 outputs but also includes ESS Sabre32 DAC technology for exceptional audio fidelity. Its combination of high-quality preamps and digital connectivity options makes it versatile for recording drums in various environments.
What Features Should You Look for in Mixers for Drum Recording?
When choosing mixers for drum recording, consider features that enhance sound quality and flexibility.
- Number of Channels: A good mixer should have enough channels to accommodate all your drum microphones. This allows you to capture each drum and cymbal separately, which is crucial for mixing later.
- EQ Options: Look for mixers that offer built-in equalization controls. EQ allows you to adjust frequencies for each channel, helping to enhance or cut specific tones for a more polished sound.
- Auxiliary Sends: Auxiliary sends are essential for routing signals to effects processors or monitors. This feature is particularly useful for adding reverb or other effects during recording or for sending a separate mix to musicians.
- Built-in Effects: Some mixers come with built-in effects, which can include reverb, compression, and delays. These effects can help shape your drum sound directly at the mixing stage, saving time in post-production.
- Phantom Power: If you’re using condenser microphones for your drum setup, ensure the mixer has phantom power. This feature provides necessary voltage to condenser mics, enabling them to function properly.
- Direct Outputs: Mixers with direct outputs for each channel allow for the individual tracking of drums. This feature gives you greater control during the mixing process, making it easier to edit and mix each drum sound separately.
- USB Connectivity: A mixer with USB output can facilitate direct recording to a computer. This feature is particularly useful for home studios, allowing for a seamless integration with digital audio workstations.
- Faders and Controls: Smooth faders and intuitive controls are crucial for adjusting levels quickly during recording sessions. Ergonomic design can enhance workflow, making it easier to respond to changes in dynamics as you record.
How Can You Improve Sound Quality in Your Drum Mic Setup?
Improving sound quality in your drum mic setup involves several key considerations and techniques.
- Microphone Selection: Choosing the right microphones for your drum kit is crucial. Dynamic mics are typically used for snare and kick drums due to their ability to handle high sound pressure levels, while condenser mics work well for overheads and capturing the overall kit sound due to their sensitivity and frequency response.
- Placement Techniques: The positioning of the microphones can greatly affect the sound quality. Experimenting with mic placement, such as the distance from the drum, angle, and height, can help capture the best tone and reduce unwanted bleed from other instruments.
- Use of Isolation Shields: Isolation shields can help minimize the impact of ambient noise and prevent sound leakage from other instruments. By placing these shields around the microphones, you can focus on the specific drum’s sound, leading to a clearer recording.
- Preamp Quality: Using a high-quality preamp can enhance the overall sound by providing better gain and clarity. A good preamp can add warmth and detail, which is especially important for dynamic and condenser microphones used in a drum setup.
- Proper Gain Staging: Setting the appropriate gain levels for each microphone is essential to avoid distortion and maintain headroom. Proper gain staging helps ensure that you capture the full dynamic range of the drums without clipping, resulting in a cleaner sound.
- EQ and Compression: Utilizing EQ and compression during mixing can significantly improve the final sound of your drum tracks. EQ allows you to carve out unwanted frequencies and enhance the desired tones, while compression helps control the dynamics, making the drums sound more polished and cohesive.
What Common Mistakes Should Be Avoided When Setting Up Drum Mics?
When setting up drum mics, there are several common mistakes to avoid for achieving the best drum mic setup.
- Poor Mic Placement: Incorrect placement of microphones can lead to imbalances in sound and undesirable frequency responses. Mics should be positioned to capture the best sound from each drum while minimizing bleed from other instruments.
- Neglecting Phase Issues: Failing to consider phase relationships between microphones can result in a hollow or thin sound. Ensuring that all mics are in phase, particularly when using multiple mics on a single drum, is crucial for achieving a full, rich tone.
- Using Inadequate or Wrong Microphones: Not all microphones are suitable for every application, and using microphones that don’t complement the sound of the drums can lead to poor recordings. It’s important to choose dynamic mics for snare and kick drums and condenser mics for overheads to capture the full range of frequencies.
- Overcomplicating the Setup: Trying to mic each drum individually with a plethora of microphones can complicate the mix and create a cluttered sound. A more streamlined approach, such as using a few well-placed mics, can often yield a better overall sound.
- Ignoring Room Acoustics: The acoustics of the room can greatly affect the sound captured by the microphones. It’s essential to consider the room’s size, shape, and materials, and, if necessary, use acoustic treatment to minimize unwanted reflections and reverberations.
- Failing to Test and Adjust: Skipping the testing phase can result in a subpar mix, as it’s crucial to listen to each microphone’s output and make necessary adjustments before recording. Always perform sound checks to identify and rectify issues like feedback, unwanted noise, or imbalance.