How To Build a DIY Chicken Feeder

"We may earn a commission from purchases made using our links. Please see disclaimer."
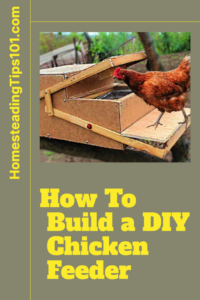
As a fellow chicken enthusiast, I know one of the recurring costs of owning chickens is buying feeders. But with some simple materials and tools, you can build your own customized feeders to save money and create a functional feeder perfectly suited to your flock’s needs. Here’s my advice on how to build a DIY chicken feeder in your coop.
Why Build Your Own Chicken Feeder
 Saves Money on Store-Bought Feeders
Let’s face it, chicken feeders can be expensive to purchase, especially for large flocks. But with
some scrap wood, plastic troughs, and hardware like hinges and screws, you can construct a quality feeder for a fraction of the cost. Saving money is always a bonus when raising chickens!
Building your own feeder allows you to fully customize the size, shape, and features to perfectly fit your flock. You can build a larger feeder to accommodate more chickens, or make compact mini feeders for just a few birds. The cost savings from a DIY feeder really add up over time when you consider the recurring cost of purchasing commercial feeders. With just a few basic materials and tools, you can construct a customized feeder tailored specifically for your flock while saving money in the process.
Customizable to Your Flock’s Needs
One of the best parts about a DIY feeder is you can customize it to your specific needs. Build it to fit your flock size, include roosts or perches, and adjust the height or feeding stations as needed. Store-bought feeders don’t always take into account your chickens’ habits or preferences.
When constructing a DIY chicken feeder, you have the flexibility to fully customize it based on your particular flock’s needs and behaviors. For example, you can add lower perches and feeding stations for younger chickens, or make the feeder taller with higher access points for large chicken breeds. If you have a mix of chickens, build the feeder to accommodate both smaller and larger birds. The ability to customize and modify the feeder means it can grow and evolve along with your flock.
Fun DIY Project for Chicken Owners
Who doesn’t love a good DIY project? Building your own feeder is not only cost-effective but can be a fun woodworking project for any chicken enthusiast. It’s always satisfying to create something with your own two hands for your flock to enjoy.
Constructing a DIY chicken feeder is a great weekend project for any handy chicken owner. Not only will you save money on store-bought feeders, but you can also take pride and satisfaction in creating something unique with your own skills and labor to nourish your flock. It’s also a good introductory woodworking project to practice basic carpentry skills like cutting, joining, framing, and more. The finished feeder will be a testament to your handiness while also feeding your beloved chickens.
Materials Needed for Chicken Feeder Project
To build your own DIY Chicken Feeder, you’ll need:
 Wood
Wood
Use scrap or untreated wood to construct the feeder’s frame and base. Pine, plywood, and 2x4s are common choices. Make sure the wood is sturdy enough to handle daily chicken use.
For the frame and base, opt for weather-resistant woods like cedar or redwood that can withstand outdoor elements and seasonal changes. Avoid treated lumber, as the chemicals can leech into the feed. Upcycled wooden pallets also make great material for sturdy, rustic chicken feeders. Ensure any wood is thick and rigid enough to support active chickens without warping or rotting quickly.
Hardware like Hinges and Screws
You’ll need hinges, screws, nails, corner braces, or anything to affix the wood pieces together. Make sure they are galvanized or rust-resistant. Use corrosion-resistant hardware designed specifically for outdoor structures and wet environments. Stainless steel offers superior durability compared to standard hardware. Always pre-drill holes when using screws to prevent splitting or cracking the wood. Galvanized nails are ideal for assembling a feeder for rugged daily use.
Plastic or Metal Feeding Troughs
These are essential for holding the actual feed. You can use plastic PVC pipe cut in half or purchase metal galvanized feed troughs. Consider the size of your flock when selecting. For plastic feed troughs, food-grade HDPE or Polyethylene plastic works well for durability. Ensure any plastic is BPA-free and non-toxic. Metal troughs like galvanized steel are virtually indestructible, chew-proof, and easy to sanitize. Calculate the required trough size and volume based on your total flock numbers and daily feed amount.
Wood Stain or Paint (optional)
Staining and painting the wood can help protect it from the elements and make it last longer. This is an optional step you can skip and let the wood age naturally if you prefer. Using an outdoor-rated stain, sealer, or polyurethane helps protect the feeder from weather damage and moisture absorption. Make sure any finishes are completely non-toxic once fully cured before chickens use the feeder. Paint also lets you customize the feeder’s look and add your own personal flair.
Building the Frame and Base
The frame and base provide the structure and stability for your feeder. Here’s how to construct it:
Cutting the Wood

Measure and cut your wood to the desired lengths for the feeder sides, front and back, plus the base. A circular saw or miter saw works well for straight cuts.
When cutting wood pieces to size, double-check all your measurements first. Clamp the wood securely to a sturdy worktable before making any cuts for straight edges. You may also want to sand cut edges smooth for safety and appearance. Always use sharp saw blades and cut slowly for splinter-free edges.
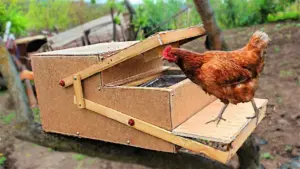
Assembling the Side Pieces
Attach the front and back pieces to the two side pieces using wood screws or nails. Use corner braces or wood glue for reinforcement. Glue or screw the feeder wall pieces together in stages for easier assembly. Test fit first before permanent attachment. Apply exterior-grade wood glue between joints for maximum strength and rigidity. Avoid over-tightening screws to prevent cracking the wood.
Attaching the Base
Screw or nail the base to the bottom of the feeder’s side frame you’ve constructed. Make sure it’s secure and sturdy. Only attach the base as the final step after the feeder box structure is fully assembled. Pre-drill and countersink all hardware for a flush fit. The base must be completely rigid to prevent tipping and support the weight of feed and chickens. Reinforce the base connection with framing anchors or metal brackets.
Adding a Roof (optional)
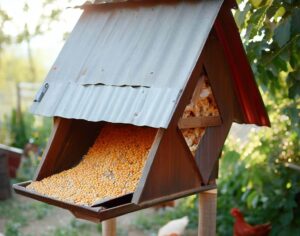 For additional weather protection, you can construct a simple A-frame roof and attach it to the top of the feeder. This is an optional step. An angled roof allows rain, snow, and debris to slide off, keeping the feeder interior dry. Use corrosion-resistant metal roofing or properly sealed plywood for durability. Extend roof overhangs well beyond the feed trough opening to protect from precipitation.
Adding the Feeding Trough
Now for the important part – adding the feeding troughs. You have a couple of options:
Hanging Trough Style
Hang your plastic or metal troughs from the inside top of the feeder using hooks, chains, or wire. This allows troughs to be removed or heights adjusted. Space hanging hook, chains, or wire supports evenly for stability. Use sturdy metal hooks and galvanized hardware resistant to rust. Removable troughs make cleaning and filling easy. Ensure chains can support weight when feed is loaded.
Mounted Trough Style
Directly attach the troughs to the front of the feeder using screws or hardware. Provide a lip or catch underneath to hold the feed.
Pre-drill holes and countersink all screws for a flush, secure fit when mounting troughs directly. Caulk around the edges to prevent moisture from seeping in. Place trough opening at optimal chicken head height for easy access while feeding.
Customizing Your Feeder
Here are some ways to customize your feeder to match your flock:
Number of Feeding Stations
Add as many troughs/feeding stations as needed to prevent crowding and allow all birds to eat at once.
Calculate the number of feeding stations based on your total flock size. As a general rule, plan for 1-2 linear inches of trough space per chicken. Reduce crowding by including multiple troughs at varied heights on both sides of the feeder.
Perches and Roosts
Install wooden perches or roosts on the feeder’s frame for added chicken comfort. Great for smaller flocks. Low perches give young chicks easy access to the feed. Position roosts above or adjacent to troughs so perching chickens don’t scratch and fling feed everywhere. Opt for smooth sanded dowels to prevent footing injuries.
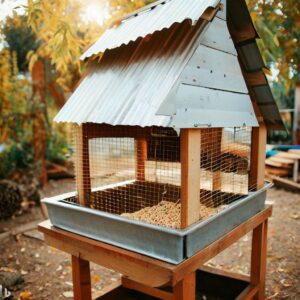 Protection from Rain and Wind
Use a roof or side panels to protect feed from getting wet in rainy weather. Place in a sheltered area safe from wind which can blow feed around.
Situate the feeder in a covered coop or run away from rain and prevailing winds. Close any gaps in walls with wood strips or flashing to prevent drafts from blowing feed out. Face opening away from the wind to keep feed dry.
Building your own chicken feeder is a fulfilling project that can save you money in the long run. And you can feel good knowing your flock has a feeder tailored just for them. From choosing materials to construction to adding custom touches, you can be as creative as you want. Your chickens will appreciate the effort once mealtime comes!
Conclusion
Constructing a DIY chicken feeder requires some basic woodworking skills and tools, but the end result is a functional, cost-effective feeder that’s customized to your flock. And being able to save money while also providing your chickens with a sturdy feeding station they’ll happily use makes the time and effort worth it. Whether opting for a hanging trough style or mounted design, you’re able to include helpful features like roosts, multiple feeding ports, and weather protection that suit your chickens’ needs. So don’t be afraid to flex your DIY muscles and build them the perfect feeder. Your birds and wallet will thank you!
FAQs
What kind of wood should I use to build the feeder?
Pine, plywood, and 2x4s are great wood choices due to their availability and cost. Just avoid treated lumber since it can be harmful.
How do I mount troughs directly to the feeder?
Use metal brackets, corner braces, or wooden cleats underneath the troughs screwed into the feeder for added support.
Should I include a lid or cover?
A lid can definitely help keep feed dry but is optional. Just be sure not to cover the feeder fully or limit access to the feed.
How much feed will the troughs hold?
The amount of feed held depends on trough size, but plan for 1-2 pounds per chicken daily. Add more troughs for larger flocks.
What size and height should I make the feeder?
Aim for a height your chickens can comfortably reach. 2-3 feet off the ground is ideal. Size depends on flock numbers, but 2′ x 3′ is a good starting point.